By Claude Whalen:
“I always thought that the dice had something to do with it.”
– General Oh. Oh. Howard describing the results of the First Day at Gettysburg
After running a few tests of the tutorial scenario of Hermann Luttmann’s new “Blind Swords Lite” system in his new game “The Devil’s To Pay,” I completed my first play of the full historic “First Day at Gettysburg” scenario.
Before I tell my tale of this first test, there are some points that need to be stressed about the new “Blind Swords Lite” system. The game scale is larger (250 yards per hex), most brigades have two counters (it isn’t a regimental system) and turns are now an hour long (not 20 minutes). Offensive fire comes first, movement comes second, defensive fire is third and finally, there can be assault combat. A big difference is that BOTH sides roll dice in any ASSAULT combat, which should make it harder to have lucky rolls decide combat. Finally, I played solo and did not try to roll for any optional reinforcements.
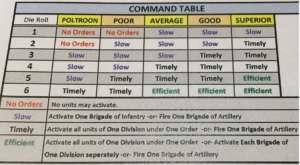
Basically, in “The “Blind Swords Lite –The Devil’s to Pay: The First Day at Gettysburg” a player pulls a random chit. It usually contains the name of a Corps Commander, Division Commander or a Random Event. If it is a Commander’s chit it will also provide his efficiency rating, which is a measure of how likely it is all, some or none of the units under his command will be able to perform his order to the best of their ability in one hour or less. The player who controls that commander then rolls one die and cross-refers the commander’s rating with the die roll and activates those sub-units, with either an Attack, Defend or Maneuver order. For example, a Commander rated a “Poltroon” will be unable to activate any of his units within one hour a third of the time, he will activate a small number of his subordinate units half the time and he will activate most of his subordinate units in some manner a sixth of the time. Units can be activated or not, multiple times. (Used with the designer’s permission).
So here we go, it is 9 am and the very first chit pulled out of the cup was the “Fog of War.” My roll was a “66,” which meant a Confederate General casualty and since Heth (Confederate generals are in italics) has to be the first CSA leader lost, down he goes. Clearly hit by artillery fire, as no troops had actually moved yet, Heth (Command rating Poor) shows General Polk how it is done. As for the actual action, the CSA slowly moved forward even with Heth’s replacement as a poltroon. AP Hill (Command rating Poor) rolled a “6,” the Inspired Leadership chit put him back into the cup and he managed to roll another “6.” Without that bit of luck, the CSA would have had a very slow start. Though it is not a likely occurrence, it is nice to see that the game can make up for a freak cannon shot. Finally, the only assault combat came when the “Hot Headed Rebels” chit was used to force Archer’s 6 strength points-4 morale unit to attack Cutler. Archer took a depletion/skedaddle 1 (D/SK1 for short) and so that portion of Archer’s brigade was tied up for a good portion of the morning. A “Union Fatigue” chit was used to slow Meredith’s troops up but a timely Union “Divisional Redeployment” chit fixed that short delay.
At 10 am, both sides continued a fairly ineffective artillery duel (remaining leaders paid attention after Heth got holed). Coster went after Archer’s other unit but suffered a “D” result for his trouble. Coster continued to have a bad hour as a “Wayward Move” chit separated his fresh unit away from his damaged one, thereby lowering both unit’s morale. That Wayward Move also led to a “Rebel Yell” attack that inflicted a “Shaken/Skedaddle 1” (S/SK1 or “Shaken/SK1” from now on) on Coster’s fresh unit. While all this was going on at the southern end of the Union line, Hill and Heth’s replacement (both rated Poltroons) continued to bring brigades up one at a time. They were so slow that Buford’s men advanced to the next western ridge in an attempt to further slow Hill’s progress.
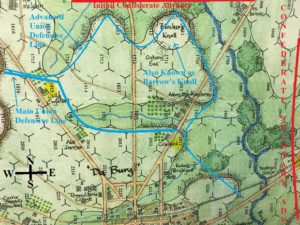
A close up picture of a typical opening position north of Gettysburg. (The full map is by Rick Barber.) In the “Blind Swords, Lite” system assaults are handled differently than in the standard “Blind Swords” series. In the “Lite” version, both sides roll dice. Then each determines how successful their actions were and cross-refers the two results to obtain the assault combat’s overall outcome. Each side may roll anywhere from an 11 to a 66. The higher numbers are better.
By 11 am, the battle really started in earnest. The artillery still traded S/SK1 hits and most of the time, enemy units take the skedaddle results as there still was some space between the two lines. (The “/” in a combat results means the receiving player has the choice of taking either result.) Remembering Hermann’s comment about making the “Iron Brigade” into a monster unit, I played the “Hurrah” chit on Meredith’s 8-5 unit (the first number is a unit’s strength and the second its morale, which tops out at 6) so that I could see how strong it could become. Reynolds rallied Coster (as the game progressed, I found myself using the “Defend/Rally” order quite a bit as it is a great way to get rid of those pesky Shaken markers). Meredith then attacked Brockenbrough’s huge unit and I immediately realized that, though it is huge, it is also a single unit brigade and therefore has lower morale, which makes it fragile due to there being fewer ways for it to be supported. Though Brock (for short) fought well, he took a “Shaken,” while giving Meredith’s 7-5 unit an “SK1” result. Bad luck befell Brock though as a “Wayward Move” result forced him to attack Meredith’s 8-5 unit (with the Hurrah chit and higher morale). Results are never guaranteed in any “Blind Swords” game but Brockenbrough’s “Depleted/SK1” result didn’t come as a shock. His troops spent the remaining portion of the turn splashing about in a nearby creek, trying to rally but basically they were done as a fighting force.
Buford’s troopers fought well and smacked two of Davis’ units with “S” markers. AP Hill rolled another “6” and he used that to remove a number of “Shaken” markers. Poltroon Heth’s replacement managed to get “No Orders,” so the CSA foot-dragging continued (for this play at least, the rules are making the CSA act quite historically). Finally, a “Rebel Yell” chit allowed Pettigrew’s 10-3 unit to strike Rowley’s two units. Pettigrew took a “Shaken” from defensive fire but he managed to inflict two “Shaken/SK1” on Rowley.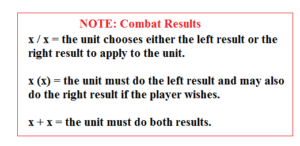
It is now Noon but there was no lull in this game so the artillery plinking continued. As I played deeper into the game, the true value of artillery became more evident (more on that later). The “Hot Headed Rebels” chit was used on poor Brock’s unit and his men came out of the creek to attack Meredith’s 8-5 unit (no Hurrah chit this time though). Meredith didn’t need the extra morale as he gave the Rebels a “Depleted/SK2” and effectively knocked this Rebel brigade out of the battle. With Brockenbrough beaten, the Rebel center suddenly became very weak but the timely arrival of Pender plugged the hole (though it cost the Rebel the ability to attack elsewhere). Right after Pender’s arrival, the “Hurrah” chit is once again put on Meredith’s 8-5 unit. AP Hill (Poltroon) rolls another “6” and even though a “Rebel Fatigue” chit slows him down, he gets Pettigrew to force Rowley back with another “SK1” result.
 Though it is one day early, Pender (rated as Good) gets put back into the cup with the “Inspired Leadership” chit. He decides to get his troops ready for another push forward and rides around his lines shouting orders. The “Fog of War” chit comes up (remember that my very first roll of the game was a “66” which, if not for the Heth rule, would have hit Pender if he was on the field) and I roll…….a “66”! Down goes Pender; the Rebels now have AP Hill and two replacement leaders running the show on the western portion of the battlefield.
The next three chit pulls are “Reynolds-Union Divisional Redeployment-Robinson” which allows Baxter/Stone/Paul brigades to race up to the far right of the Union line and provide a strong defense against the Rodes attack that I know is coming (this turns out to be a mistake and shows how fascinating this game can be). While that is going on, the Rebel “Rally round the Flag” chit manages to flip Archer’s 6-4 unit back over to its Fresh side (a first for me as Rallying troops is harder in the “Blind Swords Lite” system). With the CSA leadership busy getting shot, the “CSA Divisional Redeploy” chit continues to be invaluable; this time it brings Scales men up to bolster Archer’s recovering brigade. Pettigrew fires on Rowley (whose arrival on the map puts him in a tough spot if he doesn’t make a bee-line for the main Union force) and inflicts a “Shaken/SK2” on him. Finally, a “Rebel Yell” chit is played at the very end of the turn and Cutler’s 6-3 unit is broken.
With the morning turns done, the game does the following:
Leadership ratings have a historical feel;
The proper usage of chits can keep things moving (slowly but still moving) when things go badly for the Rebels;
Meredith is NOT an unstoppable monster when paired with the “Hurrah” chit; and,
The game FEELS like a regimental game without a mass of counters.
At 1 pm, Rodes/Early start out slowly but General Howard (Poor) actually has a timely result and sends Krzyzanowski (Krzy from here on out and Schimm for that other guy) to Barlow’s Knoll. “Hot Headed Rebels” gets played on Pettigrew and he has to attack Cutler’s 9-3 unit. Though he gets a “Battleworn” (BW) result on Cutler, the tables are soon turned and the Rebels get an “SK1.” As an aside, the Rebels have three different potential attack chits; “For Dixie” and “Rebel Yell” are positive and the “Hot Headed Rebels” is a potentially bad charge.
Now a key point in this four-hour block of combat occurs! The “Fog of War” applies a “Chaos” chit to Meredith’s 8-5 unit, which effectively makes it useless this turn. Heth’s replacement (rated a Poltroon) gets a slow activation right after that but it still allows him to have Scales hit Meredith’s brigade. The 3-5 unit of the Iron Brigade takes a “Shaken/SK2” result while the 7-5 unit takes a “Shaken/SK1” result from assault combat. The Iron Brigade can be knocked out of line with timely chit use and this really weakens the southern portion of the Union defenses. Lane is sent in against Meredith’s chaos-ridden 8-5 unit and the two units fight to a standstill. It takes a “Rebel Yell” chit to allow Scales to inflict a “BattleWorn/SK3” on Meredith’s last unit. The stunning attack breakthrough then allows Lane to sneak in and inflict an “SK2” on Buford’s 2-4 unit. In a final note, it is not all CSA success though as Paul’s brigade breaks Davis’ 6-2 unit.
By 2 pm, the Union guns have formed a solid line right in front of the Seminary and the CSA troops are sensibly holding back. On the other side of the battlefield, “Hot Headed Rebels” is again played but it once again doesn’t work out in the Union’s favor, Krzy takes a “BW/SK2.” An earlier Union positioning mistake now comes back to haunt them.
Remember that string of three Union activations which allowed Baxter/Paul/Stone to race up to form a defensive line for the coming Rodes attack? When that happened, the Union cavalry got sandwiched into the top of the Union line that faced westward. Baxter/Stone/Paul then aligned with Devin’s right flank, faced north and spread out to the east. Buford’s cavalry was piled into stacks that averaged about 8 strength points and Meredith’s battle-worn 8-5 unit helped fill out this 3 hex portion of the Union line. With decent strength points and very good morale of “4”, the cavalry looked good on paper but they had a dangerous flaw; they enter the game on their battle-worn sides, hence two shaken results can eliminate them from the game. Usually, a cavalry unit can take a choice of either a shaken hit or retreat one hex. They can also just withdraw a hex or two before combat in a special retreat move. In this case, though, Buford’s men CANNOT retreat as that would open the rear of Baxter/Paul/Stone’s line to enemy attack. The Union cavalry has to stay, fight and die!
Pender’s REPLACEMENT (Average) rolls a “Timely” result and the entire division hits the area! Scales CSA brigade gets an “S/SK1” result but Gamble’s 2-4 unit takes an “S.” Perrin hammers Gamble’s 4-4 unit with an “S/SK1” and since Scales is already behind this Gamble unit, it is broken. Finally, Lane hits Devin and Gamble’s combined 2-4 units and eliminates them. The Union cavalry held their positions well most of the morning but once pinned, the Union cavalry can be soundly thrashed. Stone/Paul/Baxter decide to make a run for it as they watch their cavalry vanish behind them.
In a rather surprising move for this game, Cutler manages to get his 6-4 unit off of the Break Track, which is rather hard to do in this game. That is the good Union news; the Bad news is that the “Fog of War” chit came up and a Union General is hit. Under game rules, Reynolds goes first so after a bonus three hours of life, off he goes. Since the actual die roll was “46”, a very happy Buford lets Reynolds take the bullet for him.
With all the Union leadership chaos, Robinson (rated Good) manages to roll well and he gets Baxter and Paul out of that dangerous CSA sandwich. Ewell (Average) shows up, rolls a “Timely” result and sends Iverson in against Ames/Tindall. Iverson takes a “Shaken” marker but gets a “BW/SK2” on Ames 7-2 unit. Tindall’s guns got hit by the charge and take a “Shaken” hit. Iverson’s 6-2 and 8-2 units get an “SK1” on Gamble and an “S/SK1” on Paul.
At 3 pm, the guns of Gettysburg start to take their toll. McIntosh inflicts four “Shaken” markers during the initial barrage (artillery still fires first in the system). Hancock rolls a “4” and fails to enter the game. “Fog of War” again applies a “Chaos” chit to a key Union position. This time it is Paul’s brigade and that is followed up by Daniel’s men inflicting an “SK1” on Paul. The Union returns the favor though and gets a “Shaken” on Daniel’s 10-3 unit. What is left of Daniel’s brigade then tears into other Union forces: Ames 6-2 unit takes a “BW/SK1”; Ames battle-worn 7-2 unit takes another “S/SK2” hit and their retreat triggers a Dilger/Wheeler artillery retreat. Finally, Daniel takes a “Shaken” result while hitting the last portion of Paul’s force (which took a “BW”).
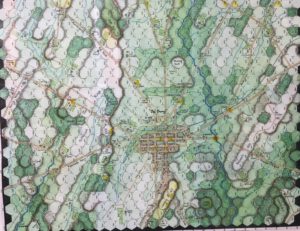
The complete map of “The Devils to Pay: The First Day at Gettysburg” by Herman Luttmann. The map is by Rick Barber. This game is scheduled to be released sometime this summer, hopefully at Origins, by Tiny Battle Publishing. (North is to the top.)
This was a third key point in the battle and the straw that broke the Union’s back on Seminary Ridge. The I Corps does NOT rout but it engages in a rapid retreat towards Gettysburg. In some mopping up for this turn, Pender’s replacement (a Poltroon) gets Scales to break Meredith’s 8-5 unit (that earlier Chaos chit was very costly). A “Rebel Yell” chit lets the CSA drive a wedge in between the I and XI Corps as Paul’s two remaining (and isolated) units are either broken (6-3 unit) or hit with a “BW/SK3” result. With everything going the Rebels’ way, Pettigrew is sent to attack the Union gun line. He takes two “Shaken/SK1” results and no Union guns were taken. Both sides’ guns are basically nuisance shots at longer range (Heth disagrees with me on that) but at shorter range, they can be very deadly (as they should be). Finally, the Iron Brigade shows its strength as Meredith’s 8-5 unit comes off the Break Track easily.
4 pm and Hancock is starting to look like Slocum as he fails his entry roll again! The AoP forces are starting to form a defensive line at the outskirts of Gettysburg, we will see if this is a tactical error quite soon. Heth’s replacement (a Poltroon) starts things off by sending Pettigrew back in against the very tired Iron Brigade. Meredith’s men have carried the load of the fighting on the southern portion of the Union line and it is starting to hurt their performance. Meredith’s 7-5 is already battle-worn so it takes another “S/SK2” result, which causes the “just off the Break track” 8-5 unit to panic. Pettigrew continues a hex too far and Meredith’s only full-strength unit (the 3-5) finally forces this Rebel probe back.
In a string of command issues, a number of leaders don’t lead. In the fighting that does occur, O’Neal’s 10-3 unit takes a “BW/SK2” but the rapidly tiring Union forces take a bigger beating: Gamble’s 2-4 unit breaks, Stone’s 9-2 unit gets a “BW/SK3” and a final Stone unit takes a “Shaken/SK1.” After all this action to the west and north of Gettysburg, Ewell finally gets his other division into action. All three brigades try to gang up on Von Gilsa’s brigade (another lonely one unit brigade) that is waiting on the other side of Rock Creek. Aided by the Creek, Gilsa does an admirable job. He takes a “BW/SK1” but he inflicts an “S/SK1” on both Hays and Gordon! Yet Gilsa runs out of luck, ammo, and courage; Early (Average) rolls a “6”, sends Avery in with a “For Dixie” chit and breaks Gilsa.
After another four hour block of play, some more notes on the game:
The cavalry rules work well. They fulfill their historical screening role, hold the Rebels back but when it comes to toe to toe fighting, their weaknesses show.
Artillery rules have also transferred nicely. Guns are a nuisance at longer ranges but can sometimes inflict real damage at effective range and they can be an attack crusher at canister range.
The Iron Brigade is not a monster that can storm around the map crushing Rebel units at will. It is very good at rallying and even getting off the Break Track though and that is probably its real strength.
Now to the finale of my very first test of the full historical scenario. There are now more battle details just because of the way things worked out (hot dice rarely happen this long):
5 pm and Hancock is still not showing up (his chances of showing get better each turn, his rolls just get lower and lower. Even Slocum is getting impatient with him). Artillery fire gets its usual few “SK1” results but they are saving their ammo for the coming charges. Remembering that the Union is still trying to hold Gettysburg itself, Ewell (Average) rolls a “6” and sends Doles, Ramseur, and Daniel into the town. Doles gets an “SK1” on Schimm and Ramseur inflicted an “SK1” on Krzy 6-3 unit (Ramseur did take an “S” from defensive fire though). Daniel carried most of the fighting load though. His 9-3 unit fought Paul’s 5-2, took a “Shaken” but broke Paul’s unit. Daniel’s 7-2 unit traded a “Shaken” for an “SK1” result on Baxter’s 7-3 unit.
Rodes got pulled from the cup next and with a “Vague Orders” chit played on him, he was only able to send Daniel forward. Daniel first fought Krzy but after a firefight loss, he had to attack at “5 v 12”. Though Daniel rolled a “66” (the best possible roll), it was not enough and he ended up with an “SK1” result. Daniel’s other unit fought Stone and Baxter. Both sides traded “Shaken” results for fire combat and then in assault combat, it was an even 10 v. 10 fight. The Rebels rolled a “65” and the Union got a “31”. Though the results were “Shaken/SK2”, two of Stone’s units were already battle-worn so they broke instead. Baxter’s unit’s retreat triggered a “Shaken/SK1” panic for both the Rowley 9-2 and Smith 10-2 units.
Two chit pulls later, Early rolls a “6” and sends Hays and future alt-history President Avery to fight Schimm. Though defensive fire gives Hays a “Shaken,” assault combat is a fairly even 12 v. 10 fight. The Rebels roll an okay “36” but the Union rolls a horrid “12”. Schimm take an “S/SK2” and triggers an “S/SK1” panic for Ames. The Union forces in town are starting to get nervous and they are packed a little too close together. A further two chit pulls later, AP Hill (Poor) rolls a “5” and brings up more forces. Wadsworth manages to get shot for the Union side and then the “Friction of War” chit forces Pender’s replacement, a Poltroon, to take a “1” Command roll. No matter, Lane is close enough to attack Schimm and it is another 12 v. 10 assault combat. Guess what, the Rebels roll a “61” and the Union comes up with a “13,” which breaks Schimm.
At 6 pm, Hancock shows up but now he has to manage a withdrawal to Cemetery Hill and Ridge, not defend the town itself. Lots of low command rolls and most movement is towards better positions.
The Union wants to get to the high ground; the Rebels want to attack but no leader rolls over a “3”. The only real fighting comes from a “Rebel Yell” chit; Perrin attacks Rowley’s 9-2 unit. Perrin’s 8-3 unit gets “BW” from defensive fire but they press on. Assault combat is 13 v. 10; the Rebels roll a “51” and the Union gets a “22”. This causes a “Depleted/SK3” and the retreat causes Cutler’s 3-2 unit to take a “Shaken” panic result. Feeling confident, Perrin pushes forward and attacks Rowley’s 5-2 unit. In a 14 v. 5 fight, the Rebels get out rolled “51” to “61”. It is too great of an odds difference though and so Rowley has to take a “Shaken/SK1” result. That one hex retreat forces Krzy’s two units to take “S” and “S/SK1” panic results.
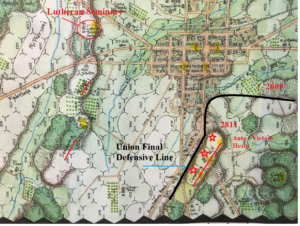
A close-up illustration of a typical Union Final Defensive Position. North is to the top. Both sides have conditions that grant them an Automatic Victory in the full game, regardless of accumulated VPs. If this condition exists at the conclusion of any full Game Turn, that side wins the game at that time: for the Union, they must control any two of the following map edge Road hexes: 1626 / 2126 / 2326, for the Confederate, they must control any 1 hex on Cemetery Hill (hexes 2911 / 3012 / 3112).
It is now 7 pm, a rather shaky Union army is on the high ground and they still have strong artillery. The Rebels are swarming around the base of the slopes and now it is “Cemetery Ridge or Bust” time. The first two chit pulls go to the Union but Robinson (Good) rolls a “2” and Doubleday (Poor) gets a “1”. Rodes (Average) is pulled next, rolls a “5” and the first wave of grey crashes against the heights. Ramseur tries for hex #2609 and Coster’s men on that high ground. With a defensive strength of 10 and a roll of “64”, Ramseur is depleted and he skedaddles three hexes away (note this fight result). Daniel takes an “S” against Krzy/Rowley but continues the assault anyway, attacking at 9 v 12. Hot dice rule though and the Rebels get a “63” while the Union takes a “23”. Krzy takes an “S/SK1” and the shaken Rowley ends up with a “D/SK1”. Smith’s shaken 10-2 unit is right behind these troops, they panic (D/SK1) and another Smith unit also panic with an “S/SK1”. The CSA has now taken a foothold on Cemetery Hill (hex 2711). A battle-worn Meredith unit attacks Daniel but only gets an “S” for its troubles. Schurz (Poor) rolls a “3” and throws a weaken Krzy 6-3 unit to force Daniel out of that hex. Of course, Daniel rolls a “65” for defensive fire and so Krzy takes a “BW/SK2”. His retreat causes Meredith’s weaken 8-5 unit to break again and the 3-5 Iron Brigade unit takes a “BW/SK1”.
Heth’s replacement (a Poltroon) wakes up, rolls a “6” and sends Archer to fight what is left of Krzy. Archer gets an “S/SK2” on Krzy and in the retreat, the Union guns hold their positions. Early (Average) now rolls a “4” and in go, Gordon and Avery. Union defensive fire is good but an interesting thing happens; the red die roll in both cases is so high and the CSA morale is still good, so Gordon is unaffected and Avery only gets an “S” result. Gordon assaults at 11 v. 10, rolls a “45” and the Union rolls a “15”. Coster take an “S/SK2”, retreats through the Union guns but those guns hold. Avery fights at 11 v. 10, rolls a “56” and the Union pulls a “21”. Baxter flees, Rowley panics “S/SK1” but Cutler holds. A fascinating set of rolls, good Union defensive fire is nearly all negated by high red die rolls and two basically even assault combats are dramatic wins for the Rebels.
The next chit pulled is Ewell (Average), he gets a “4”, a Timely result and so this is it, he can send the entire division in! Gordon charges up to fight Cutler’s 9-3 unit and Steven’s guns. The Rebels are invincible, until the dice flip sides. In an 11 v 12 fight, the Union rolls a “54” and Gordon gets a “25;” he falls back with an “S/SK1”. But now Avery is sent in against Krzy/Rowley and…..
Avery becomes the second President of the Confederate States of America! His opening volley depletes Krzy and his assault charge breaks both units. He continues his charge, Cutler’s nervous men fire so ineffectively that Avery can return fire and that breaks Cutler. Avery now holds hex #2811, which gets him on the ticket but he doesn’t want to be second banana to Jeff Davis so…..
Two chits later, the “Rebel Yell” chit comes up. Who else but Avery charges Stewart’s guns at hex 2911 (Automatic Victory hex). Defensive fire gives him just an “S” but with assault odds of 15-2, Stewart is broken. “Holy Barksdale, Batman”, the “For Dixie” chit comes out next (boosts your morale by one) and Avery grabs it. Barlow throws the battle-worn Ames at Avery but at 7 v. 14 odds, there isn’t much hope. Avery rolls a “63” and dispatches Ames like an annoying gnat.
Howard (Poor) rolls a “1” but Hancock, with his special ability, forces a reroll of “5,” Smith and Coster are both badly battered but they have to do something. Avery’s defensive fire gets an “S” on Smith and in assault combat, the Union rolls a “32” but for once, the Rebels roll a “12”. Too little, too late, Avery is on the “*****” column of the Combat Results Table (remember the “For Dixie” chit) so one Smith unit is broken and the other is “BW”.
Truly getting desperate, the Union plays “Hot Headed Rebels” on Avery (they don’t have much left) and have him charge a stack of Wainwright’s guns. Defensive fire only manages to remove the “For Dixie” chit (oh-oh) and Avery attacks at 13 v 9. The rolls aren’t too bad but the Rebels get a “45” while the Union is at “32”. Wainwright’s guns take an “S/SK1” and Avery has taken his second Automatic Victory hex (3012).
Though it happens earlier in the turn, the Rebels got to randomly throw another chit back into the cup. It turns up now; it is the “Rebel Yell” chit again. It goes to …..Avery.
Avery wants to finish clearing Cemetery Ridge but Coster is right next to him on the back slope of the ridge. Avery pivots his brigade, attacks at 14 v 6, rolls a “42” to Coster’s “13” and breaks him.
In one last gasp, Reynold’s replacement, (Average) rolls a “6” and instead of sending battered troops at Avery, he orders Wainwright’s guns to fire one last time. The red die comes up as a “6”, the Union roll is low and so…..Avery survives. The turn ends, Avery has single-handedly cleared most of Cemetery Ridge in an hour, the Rebels hold hexes 29111 and 3012 for an Automatic Victory.
Please note that your results may vary.
Personally, I doubt that I will ever get results like these again. Between the hours of 5 and 7 pm, the average Union combat roll was 29.5 while the Rebel’s average was 44.3. The Rebels won 8 out of 9 fights between 5-6pm and 16 of 18 fights at 7 pm. Avery won 8 out of 8 fire or assault combats! If it weren’t for this being my first full playthrough of the game, I wouldn’t have had extensive notes and probably would have thought that I had to be doing something wrong.
Final thoughts:
It looks like a regimental game and has the feel of “Longstreet Attacks” (the new rules tweaks blend in easily and established players will be up to speed quickly);
It plays faster (at least mechanically – you still have to think about your decisions);
The new command system is easy and quick; and,
The new assault combat rule with both sides rolling is a great idea.
It is an excellent game and one that bodes well for this series!
Game Resources:
 The Devil’s to Pay: The First day at Gettysburg – BGG Page
The Devil’s to Pay: Pre-Order Page
The Devil’s to Pay: The First Day at Gettysburg – Alpha Testing
Hermann Luttmann’s “The Devil’s to Pay”
Tiny Battle Publishing to Release “The Devil’s to Pay”




In another final test, the Rebels had a horrible time getting started. Hill, Heth and Ewell all ended up as casualties. The Union held Gettysburg and were pushing back up Seminary Ridge. “The Devil’s To Pay” offers plenty of action, some outlier results and plenty of traditional finishes. The game should be a hit!